Real-time audio is a critical part of our modern digital lives. It enables us to connect with each other no matter where we are in the world. One of the big recent trends in real-time social applications is spatial audio (sometimes called positional audio).
While traditional audio apps play each participant's voice at the same, balanced, volume in each ear - spatial audio apps play their voices in a way that's modified to account for their direction and distance relative to you in a virtual world. If someone is to the left of you, their audio will be louder in your left ear. If someone is far away from you, their voice will be quieter than someone's who is closer to you. This physically-based audio provides users with immersion and context that's not possible with normal, "phone call"-like audio.
In this tutorial we'll go through the steps of implementing Spatial Audio in a WebRTC, React app. If you're new to WebRTC - that's totally fine! WebRTC stands for Web Real-Time Communication. It's an open standard that modern browsers implement for creating live video, audio, and data functionality. You won't need to do be a WebRTC expert to understand this tutorial but it might help to get familiar with some of the concepts.
Project Setup#
This post will primarily focus on the spatial-audio related code - so we won't go over project setup. If you want more depth on the WebRTC project setup, you can look at the complete example app.
The example app uses LiveKit to interact with WebRTC. LiveKit is an open-source WebRTC SFU and set of client libraries for all major platforms. It's the library of choice for 1000s of WebRTC developers, powering millions of WebRTC sessions every day. LiveKit also shares its name with the website you're on ;).
The easiest way to run the example app yourself is LiveKit Cloud. I'll skip the whole marketing spiel, but we made a mini tutorial that shows you what's it like setting up a project.
Architecture#
Before jumping into the spatial-audio code, it's worth briefly going over the architecture of the app at a high level.
The app has a frontend component and a backend component. The backend's job is purely for token generation. It is the gatekeeper for who is allowed to connect to a room. The frontend implements the spatial audio and sending microphone and position data to LiveKit Cloud.
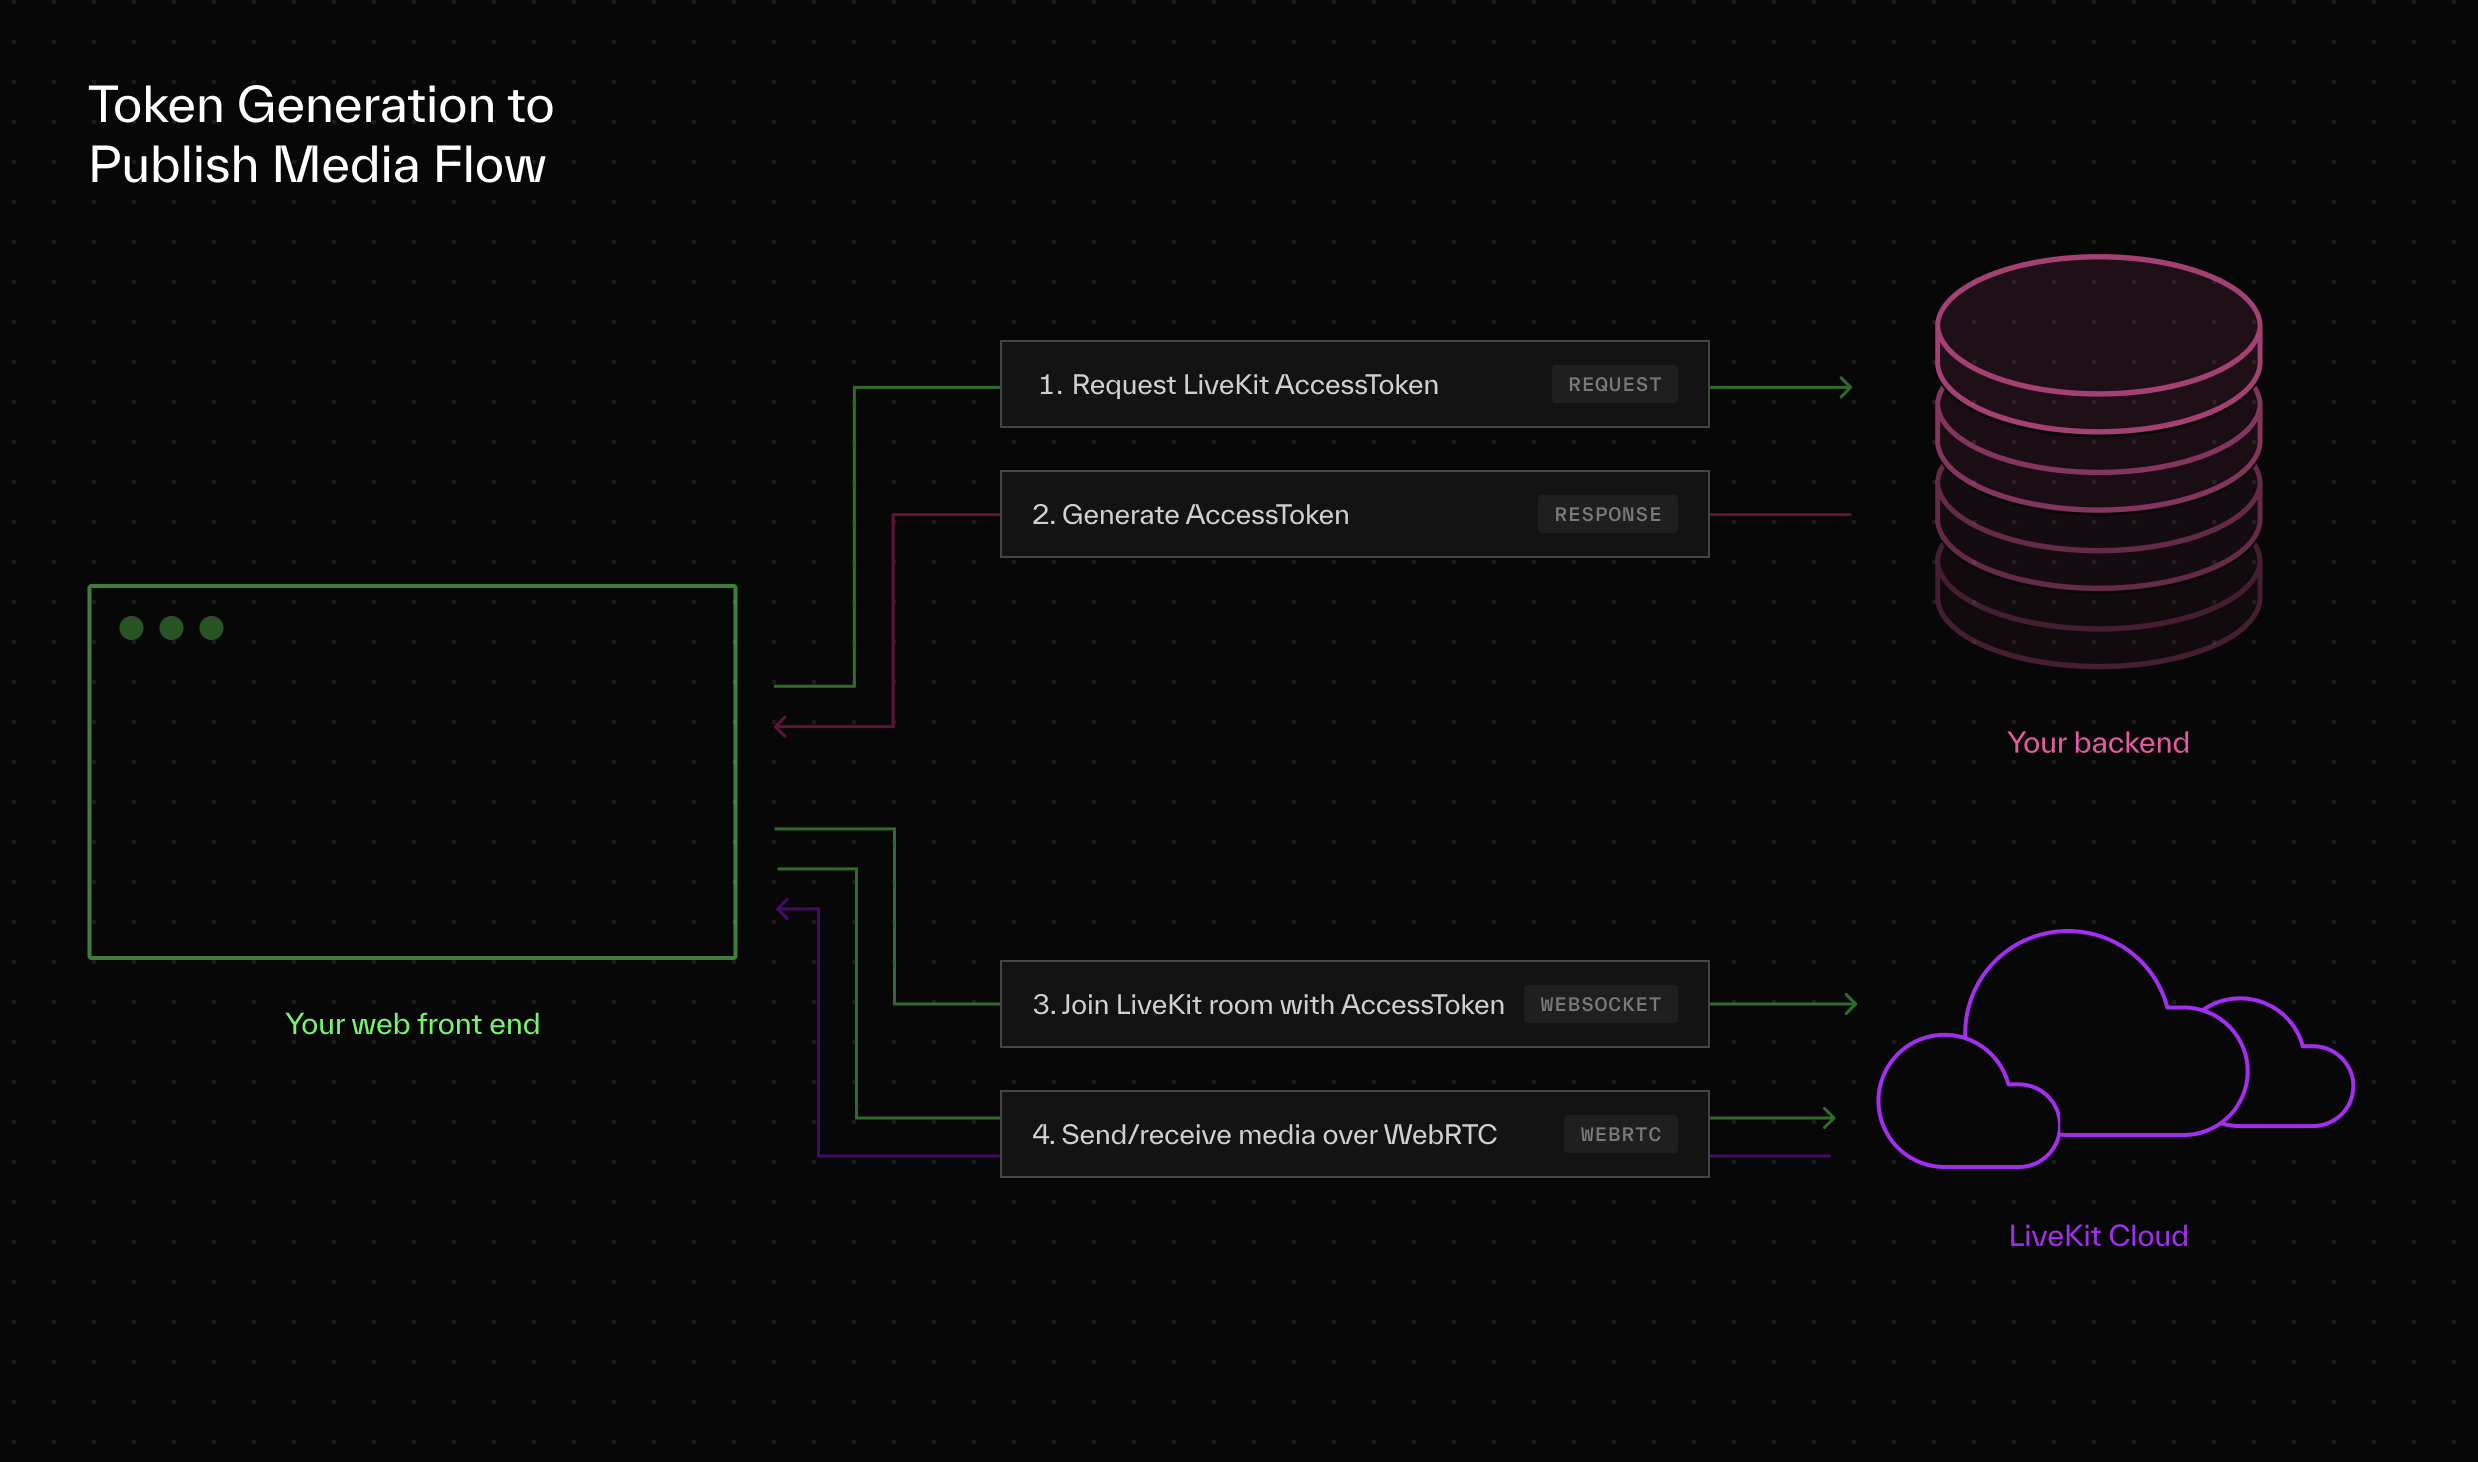 App architecture diagram
Spatial Audio#
Great, now that we got all of that covered - we can get into the meat of this post. Implementing the spatial audio functionality.
Designing the API#
Let's first think about the problem we're tackling. Spatial audio implies that each participant, whether local or remote, has a position. We'll keep things in 2D for this post but these same concepts are easily extendable to 3D.
(If you have interest in seeing an example app for 3D spatial audio - join our slack and tell us about it.)
So for inputs to the SpatialAudioController - we have an (x,y) for the local user and an (x,y) for every remote user. In LiveKit, users are called Participants - so we could say that each participant has an (x,y).
But we'll actually make our SpatialAudioController a little bit more general because we may not want all of a Participant's audio to be spatial at the same position. For example - if the participant is talking and playing music, we might want the music to have global audio and the microphone to have spatial audio.
So instead of an (x,y) for every participant, we'll use an (x,y) for each spatial TrackPublication and then an (x,y) for your own position.
So here's what our API looks like in code:
1type Vector2 = {2x: number;3y: number;4};56type TrackPosition = {7trackPublication: TrackPublication;8position: Vector2;9};1011type SpatialAudioControllerProps = {12trackPositions: TrackPosition[];13myPosition: Vector2;14};
Using the PannerNode#
Great, so we've designed our API - now let's get the SpatialAudioController to render the audio spatially. To do this we'll be using WebAudio, specifically the PannerNode from WebAudio.
The PannerNode takes an (x,y,z) for position as well as an (x,y,z) for orientation and modifies the audio accordingly. Since we're in 2D, we won't use orientation. The other difference between 2D and 3D is the coordinate system. The PannerNode uses y as the vertical component and xz for the planar components. In 2D we only have the planar components so we still map x → x but we'll map y → z.
Note that the PannerNode does not accept 2-positions (local and remote), it only accepts one position. So we'll use math to convert our two positions into a relative position that we can give to the PannerNode. Luckily the math is simple:
1const relativePosition = {2x: remotePosition.x - myPosition.x,3y: remotePosition.y - myPosition.y,4};
Rendering a Single Spatial Audio Track#
So with that, let's use the PannerNode and create a component that renders a single track spatially:
1type SpatialPublicationRendererProps = {2trackPublication: TrackPublication;3position: { x: number; y: number };4myPosition: { x: number; y: number };5audioContext: AudioContext;6};78function SpatialPublicationRenderer({9trackPublication,10position,11myPosition,12audioContext13}: PublicationRendererProps) {14const audioEl = useRef<HTMLAudioElement | null>(null);15const sourceNode = useRef<MediaStreamAudioSourceNode | null>(null);16const panner = useRef<PannerNode | null>(null);17const [relativePosition, setRelativePosition] = useState<{18x: number;19y: number;20}>({21x: 1000,22y: 1000,23}); // Set as very far away for our initial values2425// Get the media stream from the track publication26const mediaStream = useMemo(() => {27if (28trackPublication instanceof LocalTrackPublication &&29trackPublication.track30) {31const mediaStreamTrack = trackPublication.track.mediaStreamTrack;32return new MediaStream([mediaStreamTrack]);33}3435return trackPublication.track?.mediaStream || null;36}, [trackPublication]);3738// Cleanup function for all of the WebAudio nodes we made39const cleanupWebAudio = useCallback(() => {40if (panner.current) panner.current.disconnect();41if (sourceNode.current) sourceNode.current.disconnect();4243panner.current = null;44sourceNode.current = null;45}, []);4647// Calculate relative position when position changes48useEffect(() => {49setRelativePosition((prev) => {50return {51x: position.x - myPosition.x,52y: position.y - myPosition.y,53};54});55}, [myPosition.x, myPosition.y, position.x, position.y]);5657// Setup panner node for desktop58useEffect(() => {59// Cleanup any other nodes we may have previously created60cleanupWebAudio();6162// Early out if we're missing anything63if (!audioEl.current || !trackPublication.track || !mediaStream)64return cleanupWebAudio;6566// Create the entry-node into WebAudio.67// This turns our mediaStream into a usable WebAudio node.68sourceNode.current = audioContext.createMediaStreamSource(mediaStream);6970// Initialize the PannerNode and its values71panner.current = audioContext.createPanner();72panner.current.coneOuterAngle = 360;73panner.current.coneInnerAngle = 360;74panner.current.positionX.setValueAtTime(1000, 0); // set far away initially so we don't hear it at full volume75panner.current.positionY.setValueAtTime(0, 0);76panner.current.positionZ.setValueAtTime(0, 0);77panner.current.distanceModel = "exponential";78panner.current.coneOuterGain = 1;79panner.current.refDistance = 100;80panner.current.maxDistance = 500;81panner.current.rolloffFactor = 2;8283// Connect the nodes to each other84sourceNode.current85.connect(panner.current)86.connect(audioContext.destination);8788// Attach the mediaStream to an AudioElement. This is just a89// quirky requirement of WebAudio to get the pipeline to play90// when dealing with MediaStreamAudioSource nodes91audioEl.current.srcObject = mediaStream;92audioEl.current.play();9394return cleanupWebAudio;95}, [96panner,97trackPublication.track,98cleanupWebAudio,99audioContext,100trackPublication,101mediaStream,102]);103104// Update the PannerNode's position values to our105// calculated relative position.106useEffect(() => {107if (!audioEl.current || !panner.current) return;108panner.current.positionX.setTargetAtTime(relativePosition.x, 0, 0.02);109panner.current.positionZ.setTargetAtTime(relativePosition.y, 0, 0.02);110}, [relativePosition.x, relativePosition.y, panner]);111112return (<audio muted={true} ref={audioEl} />);113}
So that's it, that's all you need to spatially render a single TrackPublication with spatial audio.
Putting It All Together#
We can now fill in the SpatialAudioController to render a list of TrackPublications spatially:
1export function SpatialAudioController({2trackPositions,3myPosition,4}: SpatialAudioControllerProps) {5const audioContext = useMemo(() => new AudioContext(), []);6return (7<>8{trackPositions.map((tp) => {9return (10<SpatialPublicationRenderer11key={`${tp.trackPublication.trackSid}`}12trackPublication={tp.trackPublication}13position={tp.position}14myPosition={myPosition}15audioContext={audioContext}16/>17);18})}19</>20);21}
The complete spatial audio rendering code for the example app can be found in the SpatialAudioController.tsx file of the example project repo.
Conclusion#
In this post we showed you how you can use WebRTC together with WebAudio to create a spatial audio. A full demo using this technique is hosted at spatial-audio-demo.livekit.io that you can mess around with.
We'll be rolling out tutorials for other aspect of this example app shortly, for example, how to send player position data using data channels. In the meantime, check out https://github.com/livekit-examples/spatial-audio for the full example app source code.