Timing is everything#
WebRTC uses timestamps to keep audio and video playback smooth, synchronized, and resilient to network issues. But for use cases like robotics, the standard WebRTC RTP timestamps aren't enough for precise timing and alignment across many different sensors. Robotics systems typically depend on a ground-truth clock that the entire system is synchronized to like GPS, PTP, or another high-precision timing signal. RTP timestamps rarely align with this clock. There have been efforts to standardize mechanisms for carrying true device capture time in WebRTC, such as the Absolute Capture Timestamp extension, however as of today it remains in limbo as an expired proposal.
Today, we're announcing support for Video Frame Metadata in LiveKit. When enabled, every captured video or binary data frame (audio frames will be supported in a future version) can now include:
- User Timestamp: your ground-truth sensor timestamp in microseconds
- Frame ID: a sequential ID that allows you to uniquely reference every frame
- User Data: any arbitrary data relevant to the frame
This additional information makes it simple to precisely synchronize several tracks to a single reference clock.
What video frame metadata unlocks#
Pinning metadata to individual frames opens up workflows that were not possible before:
- Sensor alignment for robotics: stamp each frame with your system's ground-truth clock so video lines up with LiDAR, IMU, and other sensors, then export every modality with consistent time alignment.
- True glass-to-glass latency: stamp the sensor exposure timestamp from your camera driver on every frame and precisely measure latency across your whole streaming pipeline: capture, encode, network, decode, and render.
- Frame-accurate correlation: carry a sequential
frame_idso downstream consumers can line up video frames with external data such as ML inference output or transcript segments, with no separate channel to keep in sync. - Camera extrinsics and device state: attach additional metadata, such as the joint position of an arm a camera is attached to. This removes the need to buffer and correlate in a post-processing step.
How it works#
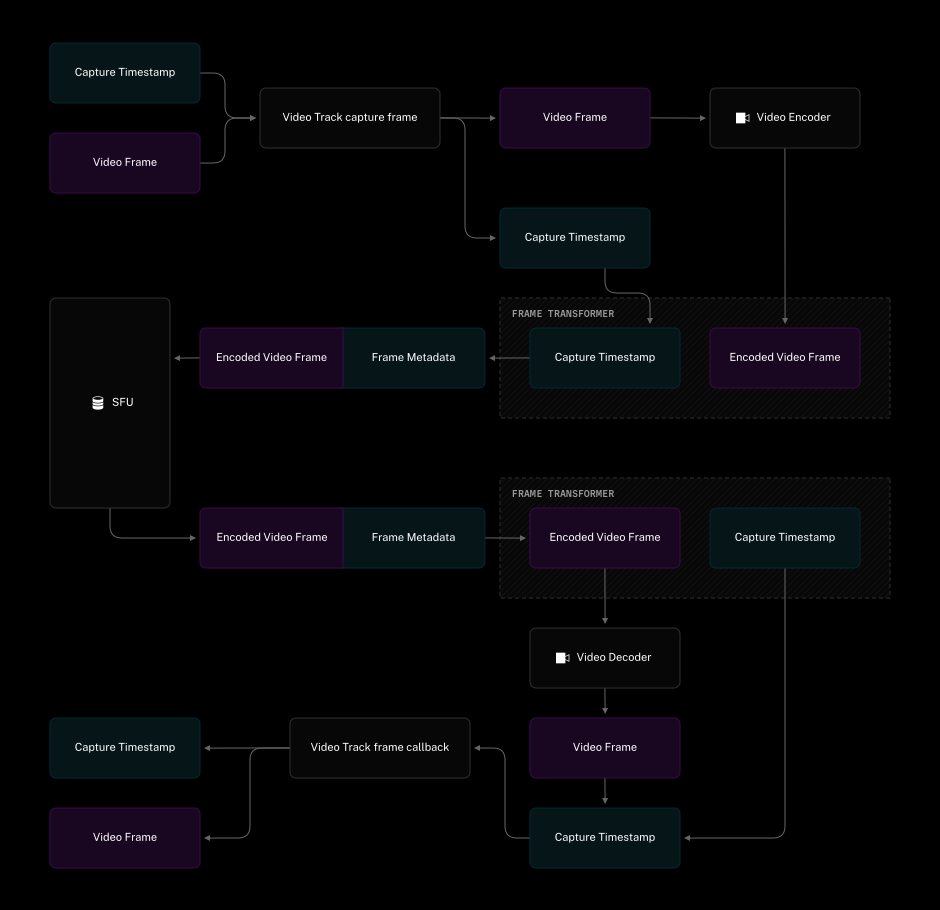
Video Frame Metadata allows the developer to attach a timestamp, frame ID, or user data to any captured frame. The protocol is designed to be flexible and allows us to add more fields down the road.
Video Frame Metadata is appended before RTP packetization to each frame as a small binary trailer. It's compatible with all video codecs supported by LiveKit and durable across the transport boundary. Metadata attributes will be emitted on the track subscriber side after the corresponding frame is decoded.
We've also added new signaling to the track publish step so that both the SFU and downstream subscribers know exactly what metadata is available on a given track. LiveKit's SFU will strip trailers for any downstream client that can't parse them, ensuring 100% backwards compatibility with client SDKs that don’t support this feature yet.
How to use video frame metadata#
Track publication#
When publishing a video track, simply enable the metadata fields you wish to attach to a track.
1// enable the metadata features you want to attach2let mut frame_metadata_features = FrameMetadataFeatures::default();3frame_metadata_features.user_timestamp = true;4frame_metadata_features.frame_id = true;5frame_metadata_features.user_data = true;67let publish_opts = TrackPublishOptions {8source: TrackSource::Camera,9video_codec: VideoCodec::H264,10frame_metadata_features,11..Default::default()12};13let publish_result = room14.local_participant()15.publish_track(LocalTrack::Video(track.clone()), publish_opts)16.await;
Frame capture#
Then attach a FrameMetadata object to each frame as you capture it.
1use std::time::{SystemTime, UNIX_EPOCH};23// auto-incrementing frame ID, bumped once per captured frame4frame_id = frame_id.wrapping_add(1);56// example attaches system time7let user_ts = SystemTime::now()8.duration_since(UNIX_EPOCH)?9.as_micros() as u64;1011// dummy application payload (kept small: the packet trailer budget is ~232 bytes)12let user_data: Vec<u8> = vec![0xAB; 16];13let frame = VideoFrame {14rotation: VideoRotation::VideoRotation0,15timestamp_us: 0,16frame_metadata: Some(FrameMetadata {17user_timestamp: Some(user_ts),18frame_id: Some(frame_id),19user_data: Some(user_data),20}),21buffer,22};2324rtc_source.capture_frame(&frame);
On the subscriber side, the published video track advertises its metadata features in TrackInfo. When receiving frames, FrameMetadata is automatically available on every frame.
1let mut stream = NativeVideoStream::new(remote_track.rtc_track());23while let Some(frame) = stream.next().await {4// check for frame metadata5let Some(meta) = frame.frame_metadata else { continue };67if let Some(ts) = meta.user_timestamp {8println!("capture time: {} µs", ts);9}10if let Some(frame_id) = meta.frame_id {11println!("frame id: {}", frame_id);12}13if let Some(user_data) = meta.user_data {14println!("user data: {} bytes {:?}", user_data.len(), user_data);15}16}
Try it#
The LiveKit Rust SDK ships a complete, runnable demonstration in the local_video example. The publisher exposes --attach-timestamp, --attach-frame-id, and --attach-user-data to demonstrate how easy it is to attach data, and the subscriber's --display-timestamp renders the frame ID, publisher timestamp, and user data on screen.
1# Publisher: attach a capture timestamp, frame ID, & mock user data to every frame2cargo run -p local_video -F desktop --bin publisher -- \3--camera-index 0 --room-name demo --identity cam \4--attach-timestamp --attach-frame-id --attach-user-data56# Subscriber: show the live data overlay7cargo run -p local_video -F desktop --bin subscriber -- \8--room-name demo --identity viewer --display-timestamp --participant cam
Video frame metadata is available now in the Rust, Python, C++, and JavaScript client SDKs. Grab the latest release, run the local_video example, and tell us what you build with it.